DHV Series - How-To Guide
Three ways to put the touch back under your finger - two take a minute, the third works when the panel answers nothing.
When taps on a WITSON DHV series head unit land a few millimetres from the icon you pressed, the touch map has drifted. This guide covers the five-finger shortcut, the Factory menu route and the USB mouse route, plus a panel test that separates drift from a failing digitizer.
Written for DHV series units with the Wlan / Device / General / Factory / User / System panel. Wording differs on other platforms.
Quick answer
Hold five fingers spread on the screen for about five seconds and the calibration screen opens by itself. Tap the centre of each red target until the unit returns to the home screen. If touch no longer responds at all, plug a USB mouse into the unit and use it to open Settings - Factory - Touch Screen Calibration.
Note: As our products are continuously upgraded, the interface on your unit may look slightly different. Please select the corresponding function according to your own model.
A capacitive panel does not report pixels, it reports a coordinate. The controller converts each reading into a position using a calibration table on the mainboard, and every action afterwards - which icon opens, where a list jumps - comes from that conversion. When the table and the panel stop agreeing the unit still works; it simply answers a few millimetres from your finger.
Drift usually follows a firmware update, a screen or digitizer replacement, a mainboard swap that carried an old table onto a new panel, or long storage at temperature extremes.
The opposite case is a panel that has stopped reporting. A strip that ignores touch, a corner that stays dead however hard you press, or taps you never made are not calibration faults - the digitizer, its ribbon connector or the controller is failing. Recalibrating a damaged panel stalls halfway, because the routine cannot register the points it needs. On the calibration screen the two resolution figures, for example 1024x600 for the screen and 1024x600 for touch, should match; a smaller touch figure means the controller interpolates across a coarser grid.
This is the shortcut our line workers use, and the fastest route on a unit whose touch still works well enough to unlock the screen. Nothing has to be found in a menu, so it survives a launcher you do not recognise.
Park the vehicle and switch the ignition to accessory so the unit stays powered. Wipe the panel with a dry microfibre cloth, take off gloves, and peel back any protective film - a film traps air and pulls the reading sideways. Leave the unit on the home screen.
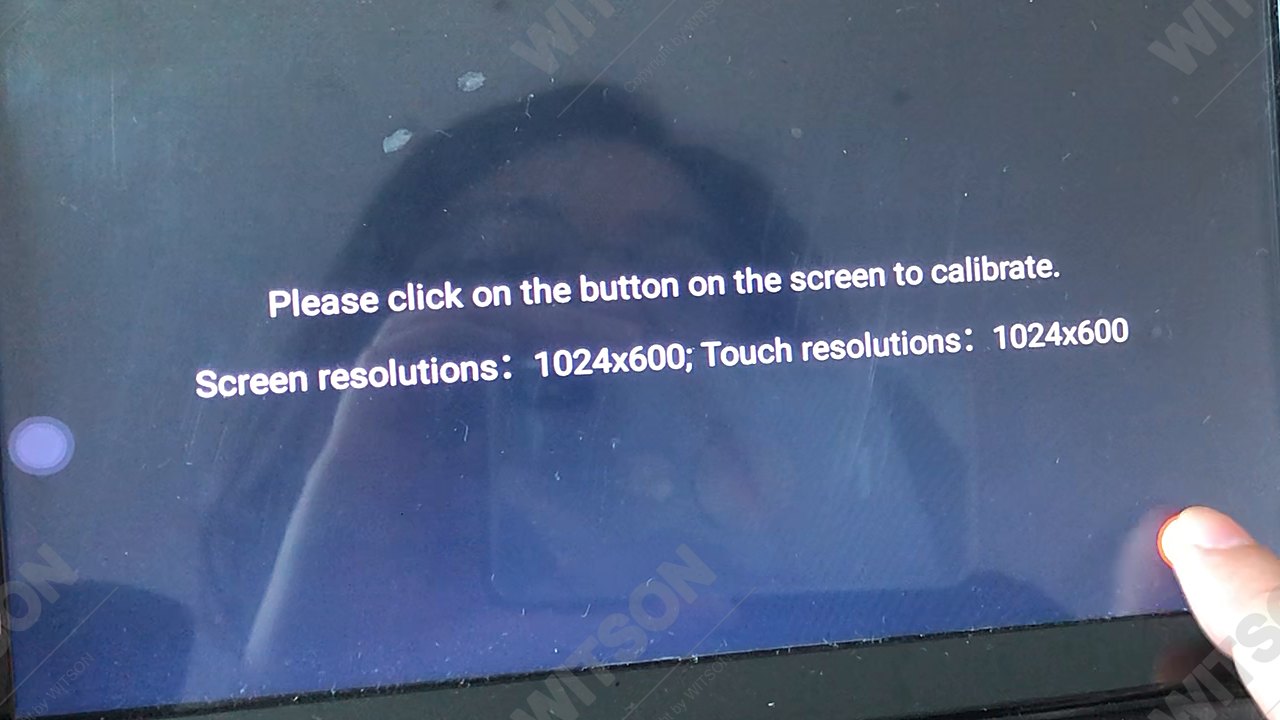
Place five fingertips spread wide on the glass and hold still for about five seconds. Do not slide, tap or lift a finger early - the unit counts contacts, and four will not trigger it. The calibration screen opens by itself: a plain background with the line Please click on the button on the screen to calibrate, the resolution readout and a target ring near a corner.
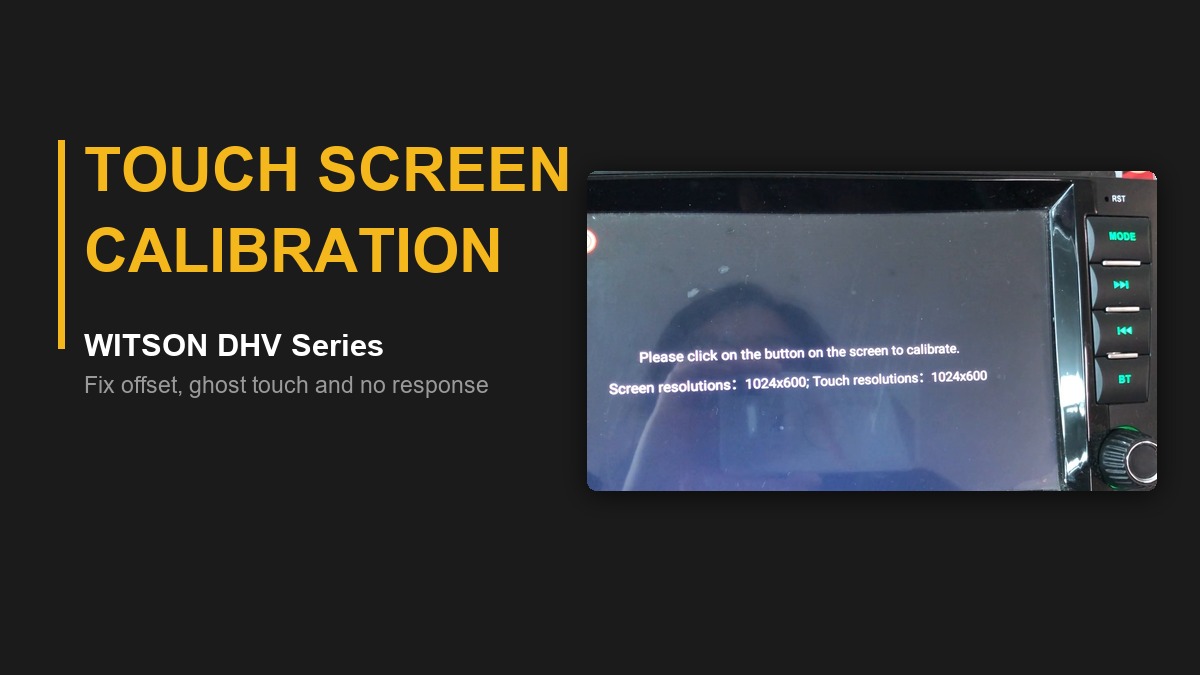
Tap the middle of the ring with one fingertip and it moves on. Work through every target - the routine walks the corners and edges, where a drifting map is worst. Use a fingernail tip rather than the flat of your thumb, and press the centre, not the rim. When the last point is accepted the unit saves the table and returns home.
Use this when the five-finger gesture does not fire, or when you want the panel diagnostic that sits in the same list. The Settings app on the DHV series opens on a page whose left column reads Wlan, Device, General, Factory, User, System; the calibration entry lives under the fourth one.
From the app drawer tap Settings, then Factory in the left column. A numeric keypad appears with the prompt Enter the password; type the factory code for your unit and tap Confirm. The code is issued with the unit and is available from WITSON support - it is not the same on every batch, so do not guess.
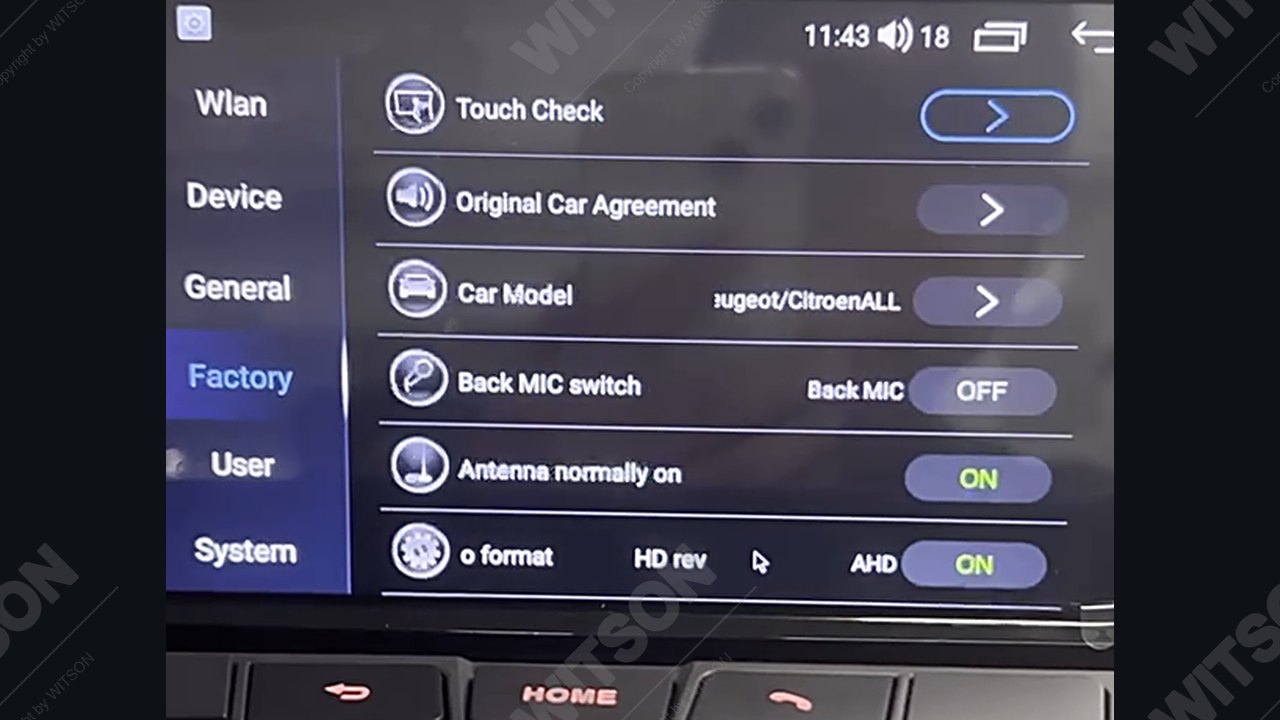
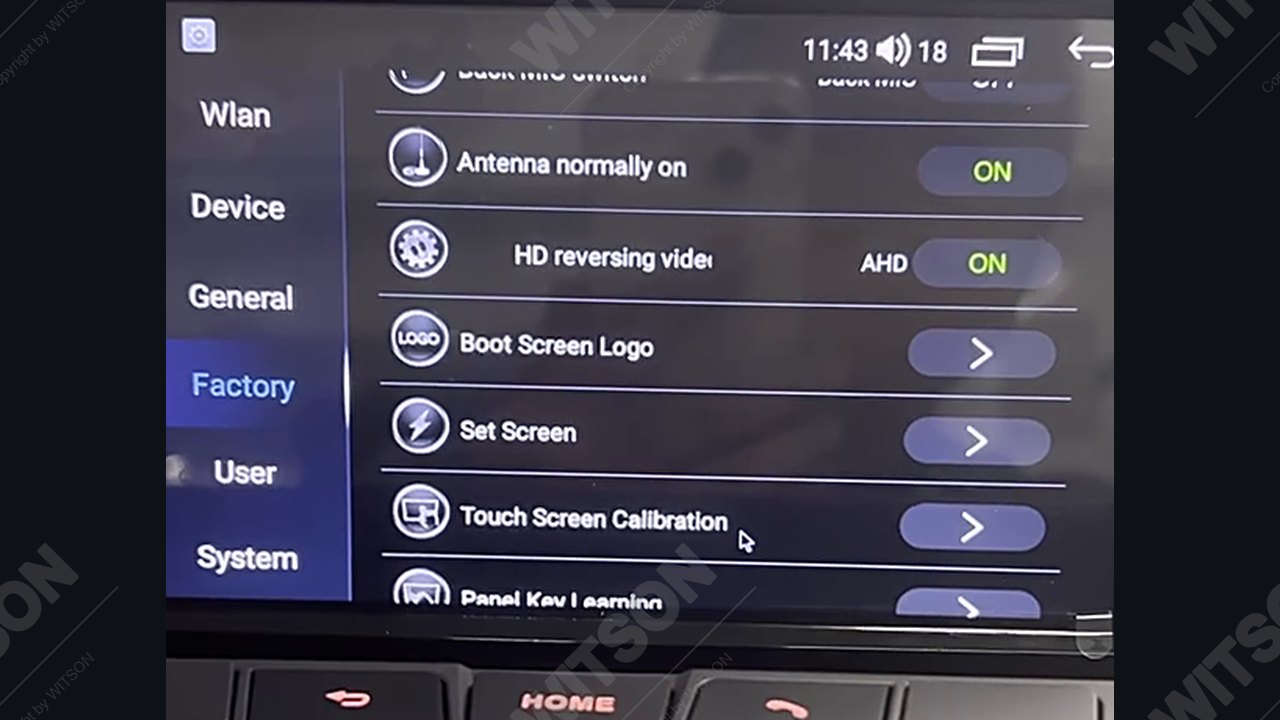
Scroll the Factory list past Boot Screen Logo and Set Screen to Touch Screen Calibration, and tap the arrow on its row. The same calibration screen opens and you tap the targets as in Method 1. Two neighbours matter: Touch Check at the top runs the panel diagnostic, and Panel Key Learning at the bottom remaps the physical buttons - leave that one alone unless you are remapping keys.
When the panel answers nothing, the unit is still a working Android computer and it will accept a USB mouse. This route gets a customer out of a locked screen without opening the dashboard, and it is why our workshop keeps a mouse in the tool case.
Plug a USB mouse into the unit USB port - the same port used for charging and USB sticks. A pointer appears within a second or two. Use it to open Settings, tap Factory, enter the password, scroll to Touch Screen Calibration and click it.
It is tempting to click the calibration targets with the mouse. Do not. The routine records where the touch panel says you pressed, and a mouse reports a position that has nothing to do with the digitizer - you would write a table further off than the one you started with. Tap the targets with your finger, then unplug the mouse and check that taps land on the icons you press.
Work down the table in order. The first two rows are calibration drift and any of the three methods will fix them. From the third row on the panel is reporting badly, and recalibrating will fail or drift back within days.
| Symptom | Cause | What to do |
|---|---|---|
| Every tap lands 5-20 mm to one side, evenly across the panel | Calibration table drifted after a firmware update or a panel swap | Recalibrate with Method 1 or 2. A constant offset on a responsive panel is the drift signature. |
| Offset is worst in one corner, near zero opposite | Scaling error between touch grid and display grid | Recalibrate and tap the corner targets precisely. Mismatched resolution figures make this expected. |
| A strip or a corner never responds | Damaged digitizer track, or a ribbon connector not fully seated | Run Touch Check. If the dead strip draws no trace, calibration cannot fix it - reseat the ribbon or replace the panel. |
| Cursor jumps between two points, or icons open by themselves | Moisture on the glass, a trapped film, or a failing controller | Dry the glass, remove the film, recalibrate. Ghost touches that survive both mean the digitizer is failing. |
| Touch only reacts to a hard press or through gloves | Film, dirt layer, or a worn digitizer surface | Clean and remove the film. If it still needs force the panel is worn; calibration will not restore sensitivity. |
| Calibration is accepted but the offset returns within days | Unstable digitizer, or a loose connector moving with vibration | Check the ribbon connector and its latch. If it repeats, replace the panel. |
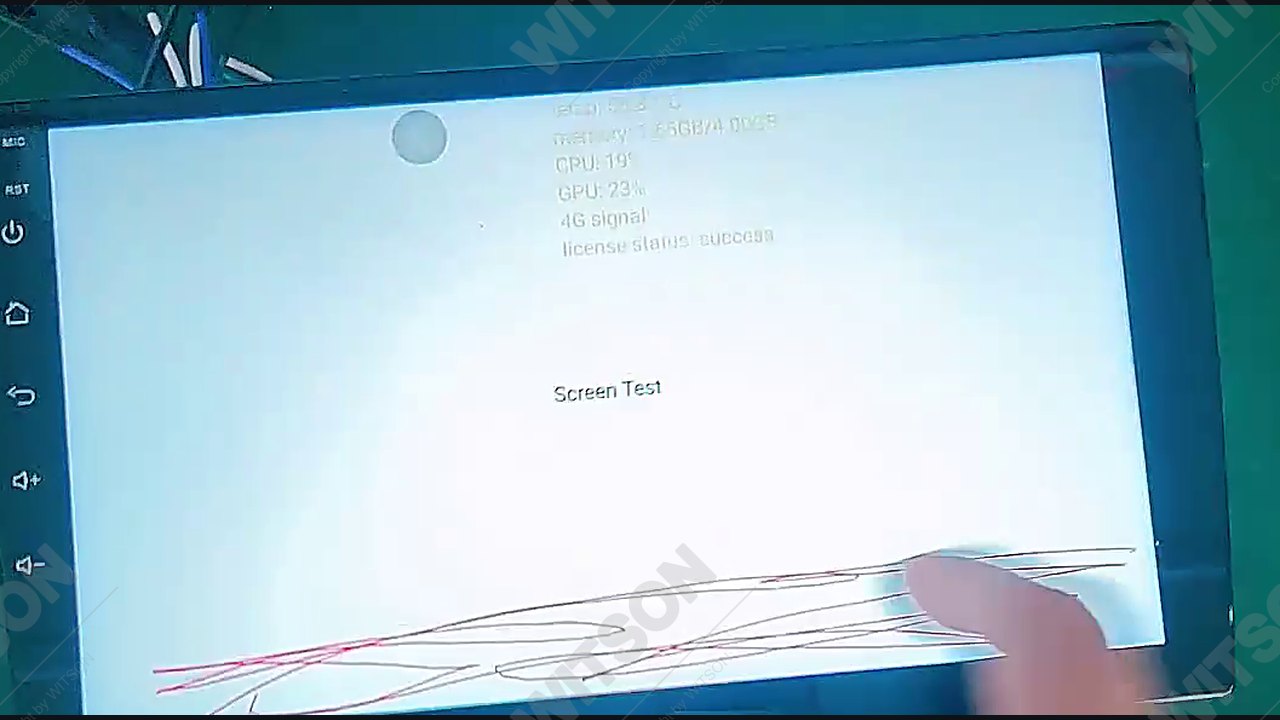
Do not judge a calibration by tapping one icon. Open the panel test - Screen Test in the service build, Touch Check in the Factory menu of a production unit - and drag one slow line into each corner. The trace should follow your finger with the same lag and offset everywhere; a trace that stops short in one region is a hardware reading, not a calibration error.
If your unit runs the 4 GB + 64 GB DHV platform, the HB / DHB 2+32 and HV / DHV 4+64 platform introduction lists the chipset and display options by variant. Menu layout and default settings are in the WITSON operation manual download section.
The clip below shows all three methods on a bench unit, in the order they appear in this guide: five fingers, the Factory route, and the mouse route with a finger on the targets.
If your network blocks embeds, open the clip directly: watch the DHV touch calibration video on YouTube.
The calibration table that converts a touch reading into a screen position has drifted, so every press is translated a few millimetres off. A constant offset across the whole panel is the classic signature. Recalibrate with the five-finger method and the icons will line up again.
Hold five fingers spread on the screen for about five seconds. The DHV series opens the calibration screen directly, with no password and no menu. The Factory password is only needed for the longer route through Settings.
No. Calibration only rewrites the touch map. Presets, saved navigation, paired phones and installed apps are untouched. If you want a clean slate for other reasons, that is a separate factory reset - our DH series factory reset walkthrough covers what that one does erase.
Remove it first. A film changes the capacitance the digitizer sees and you will calibrate against the film rather than the panel, which makes the offset worse once the film is replaced. Refit or replace it only after the calibration is confirmed.
If five fingers do nothing, at least one contact is not being registered, so the gesture can never complete. Plug in a USB mouse, reach Settings - Factory - Touch Screen Calibration, and tap the targets with your finger. If the targets still will not register, the digitizer or its connector has failed and no calibration will help.
Reference
Still off after a calibration? Send us the unit model, build date and a photo of the touch test screen.
Ask WITSON SupportBrowse the rest of the WITSON how-to guides, including our wireless CarPlay pairing guide for the DH series and the DH series interface video.